Introduction
There have been many times when you may have looked at a design or a picture and thought, ‘That needs to be on a t-shirt!’ Well, now you can learn how to transfer any design or drawing of your choice on to as many shirts as you want – even enough to sell! Custom printed shirts are all the rage, and with a little bit of work and creativity you can create a shirt that people will be exclaiming over and wanting printed copies of!
Step 1
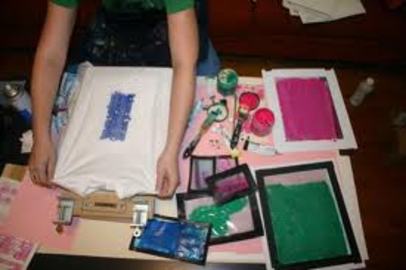
Gather all the required supplies. These include a t-shirt, screen printing ink (black or colored), a screen with frame or an embroidery hoop, newspaper, piece of cloth, an iron, glue such as Mod Podge, a sheer material such as nylon, gauze curtain material, tulle etc., old paintbrushes and sponge brush, and the design to print. The advantage of the screen hoop is that it can be used multiple times for creating printed shirts with the same design.
Step 2
Obtain your design. It should be high contrast and if you are printing it from a computer, alter it to a monochrome setting in a photo editing software if you wish for a black and white printed shirts design. Also adjust the size of the photo to fit on your shirt and in the frame or embroidery hoop. Print out the design, or if using a hand drawing, have it ready on a piece of paper.
Step 3
Fix the sheer material in the hoop/frame. It must be pulled taut within the hoop’s edges and screwed tightly or secured with nails if a normal wooden frame; you can also use a store-bought premade screen. If too loose, the design will not get printed properly on your shirts. Turn the hoop screen over so its taut cloth side is touching the design paper and position to center the design. Carefully trace the design from below onto the screen using a pencil.
Step 4
Using glue and paintbrushes, paint over all the negative spaces in your design on the right side of the screen hoop. These are all the ‘white’ spaces in your image that will not be printed on the shirts. Make sure you cover all these areas; you can hold it up to light to check for any missed spots. Let it dry completely. Place the image-side of the hoop face down on a shirt and position it as desired. Apply the ink to the image area only using a sponge brush.
Step 5
Peel back the frame and let the image dry. Then iron the front and back of the shirt with a piece of cloth in between the iron and the shirt. Voila, you have your printed shirts!
Tips
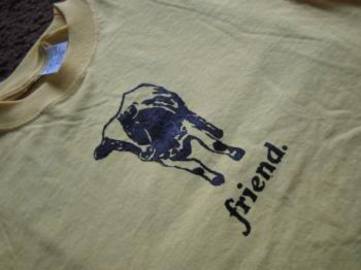
Creating custom printed shirts is easy and fun; after a few attempts you are sure to become a pro at it! When coating the design with ink, it is best to place a piece of cardboard inside the shirt to prevent ink seeping to the back of the shirt and ruining all your work. For more elaborate designs, you can move on to advances techniques using photo-emulsion kits and ‘burning’ the image with heat from bulbs. Get started and make your homemade printed shirts the envy of everyone you meet!
Sources and Citations
http://craftgrrl.livejournal.com/3674467.html
http://diyfashion.about.com/od/dyingandscreenprinting/ss/ScreenPrint_6.htm
http://www.ehow.com/how_2049872_make-screenprinted-tshirts.html
http://www.fashionnarts.com/2011/diy-fashion-how-to-screen-print-a-t-shirt/