Introduction
The motherboard of a laptop is one of the main central units that practically allows all the transfer of signals and data from all the hardware devices. It’s the circuit where all hardware connect to work with each other. When this hardware fails, and it will since it’s nothing more than a machine that requires proper maintenance and repairing, it can easily be replaced. Now this is also a great chance for you to upgrade your computer since most motherboards don’t allow new hardware and processors to be connected to them. Of course opening up your laptop to change a significant hardware like the motherboard can be challenging and scary but it’s no big deal and can be done without much effort. It’s the replacement part you should be worried about since most laptops don’t come with replacement motherboards or require you to get one out of other laptops.
History

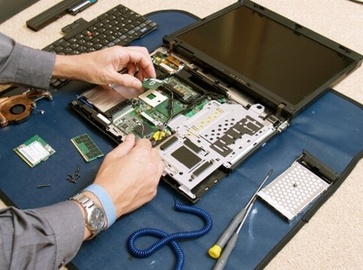
First, get a video camera to make sure you record all your movements on what part was removed from which area so you know your way back. Now refer to your owner’s manual and see the instructions in specific to the removal of other devices like the CD drives, wireless cards and others. You will be removing all the devices since everything is connected to the motherboard. If your motherboard came with a processor connected to it, then you must get a motherboard that also has the same or an upgraded processor connected to it, if there was no processor in the first place you can just connect the original processor to the new motherboard of the laptop. Now turn your laptop upside down and make sure all power connections are detached from the laptop including the battery. Remove all the screws from the casing, make sure you don’t mix the screws and remember where they came from, use a divided plate or box to keep the screws from mixing. Once you’ve removed all the screws lift the cover and you’ll see all the hardware and the wires connected to a green circuit. If your CD drive had a slider to detach it, remove it and disconnect all the other hardware you see.
Features
Now you’ll see a memory access cover screwed to protect the motherboard and other hardware. Unscrew the access cover, and loosen the clips that hold the memory chips in its place. Usually the area where the memory chips are also where the PCI cards are attached, remove them as well but carefully place them separately. Also start unscrewing and unclipping other hardware cards like the wireless cards, LAN cards and other ports and remove them from the motherboard. Now you’ll probably see the motherboard. Some laptop screen and keyboards are also connected to the motherboard, remove them if necessary and be very careful not to separate the LCD from the laptop. Unscrew the nuts holding the motherboards in its place and remove it. If the processor is separate from the motherboard and can be unclipped then remove it before removing the motherboard. Now once the old motherboard is removed put the new motherboard in and start reassembling all the parts.
Tips and comments
Make sure everything is connected properly otherwise you may have to come back and do the whole thing again. Motherboard replacement can be tricky but is easy in laptops, always refer to your manual of your laptop for proper removal and make sure you are recording your moves to trace any faults or difficulty you come across. The motherboard is the first device in the assembly line so any screw ups require you to remove all other devices.