Introduction
Windows movie maker is a software to create and edit movies. It has many effects, including transition, titles and timeline. Among windows’ many other interesting and accessible programs and softwares, one is this windows movies program. There is an option where you can add the auto narration function in your video. Now there are a few specific terms used for movie making softwares such as this one. Once you've learnt them they are the same for every movie making software.
Step 1
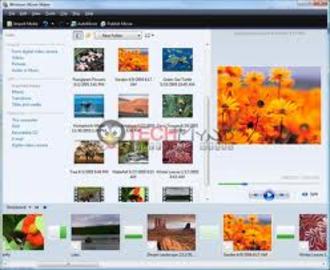
First understand the basic screen display of Windows movie maker. There is a storyboard and a timeline. The storyboard will display the chosen pictures that will be part of the movie in the sequence that they will be displayed as. The timeline view of the software will tell as to what order a certain picture or video will appear and for how much time they will appear on the screen until the next picture will appear, in the specific movie that you are making.
Step 2
Now that you have understood what 'storyboard' and 'timeline' is all about, you can load an existing movie file in the windows movie maker! The video files can have many different file types such as AVI,MPG, ASF or WMV. whichever the file type maybe, they can be selected to be added to the story board and the time for their appearance decided as to how much time they would take in the whole movie that is under creation. the movie that you just imported can be part of the still pictures display.
Step 3
After importing the video file in windows movie maker, you can edit according to taste. you can shorten it by trimming it. to get rid of the unwanted portions of the video. Enter the timeline view and zoom in the video to descriptively cut in the parts that you need to cut. go to timeline or storyboard view and select the part of video you wish to delete and select delete. this will trim the video for you. use the play button to play the movie and pause it where you want the movie to split it. now choose the split option from the drop down menu on the clip option.
Step 4
If you want to add sound to your video, select the audio file to import it into the windows movie maker. This will show you a separate area where the added audio file will be visible. The audio files will have a new timeline. This makes things easier to manage. now you can drag the audio file beneath the video timeline to bring it to the point where you want the sound to start from. whatever picture you will bring the sound file under is where the music will begin playing in the final product. you can also add narration to your movie by clicking the mic option on the screen. This specifically comes in handy when making documentaries. you can adjust your mic and test it before you begin to record.
Step 5
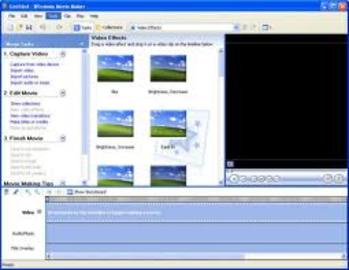
Now you can also add effects into your movie. In the windows movie maker, click the effects option and bring the view to 'storyboard'. under the 'movie tasks' drop down menu and under 'edit movie', choose; 'view video transitions'. In the storyboard choose the first picture to work on and select the desired transition effect for it. you can play the transition effect in the preview area to see how it looks. the selected transition can now be dragged between the pictures on the storyboard. to add video effects you can select the effect and add it to the star on the bottom left area of the picture on storyboard. now the file can be saved.
Tips
Now that the windows movie maker has helped you create the right movie for you, you can add end credits and titles. in the edit movie drop down menu, select add titles and credits. You can select the position on the storyboard where you would like to add your credits. you can also add subtitles or titles to the videos and pictures that you have added to the movie. The font size and color of titles and subtitles can also be changed. Now your windows movie is ready!
Sources and Citations
windows.microsoft.com/en-US/windows/help/windows-xp